Simplifying Helm Releases: GitHub Actions and Renovate for Chart Updates

Introduction:
This post is part 2 of a series outlining streamlining continuous delivery of microservices. You can read part 1 here: link
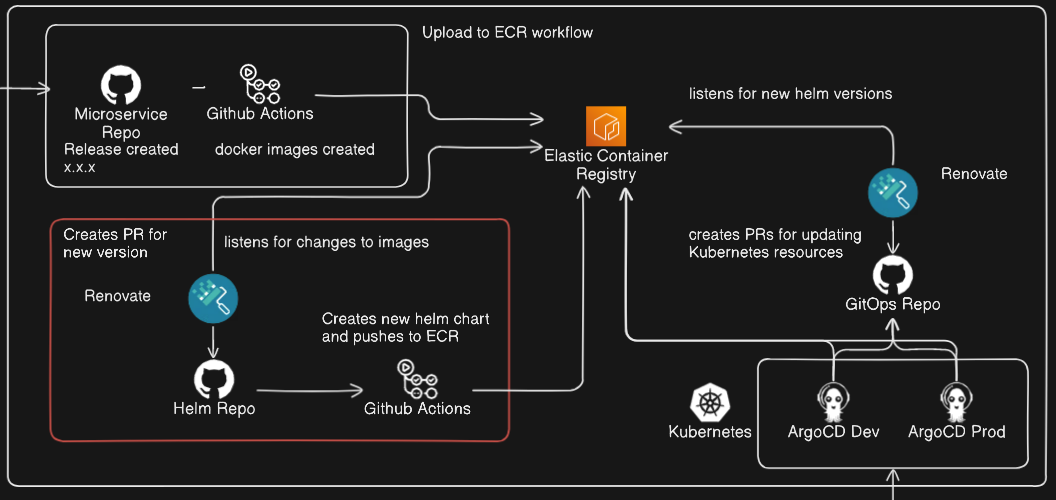
In part 1, we streamlined the process of building and storing images for our microservices in ECR using GitHub Actions, in this part, we will focus on the automation of Helm charts and keeping their dependencies up to date with the related image versions in ECR.
Use case:
We want to be able to automatically update our existing Helm chart repo which represents our microservices application whenever the images of the individual services are updating in ECR, taking the guess work out of updating your dependencies in a Helm chart.
The tech involved:
Note: We will assume you have already created an ECR repository for your Helm chart.
Kompose:
As described in part 1, we have all of the code for our microservices in a single monorepo, and at the root of that monorepo we have a docker-compose.yml file which defines the build context of our images, as well as the configuration for running our services on our local development environment.
Now, we wish to deploy our services to a Kubernetes cluster, but we don't have any manifests or a helm chart, here we can leverage our existing docker-compose.yml file and Kompose, we can use Kompose to generate all of the individual Kubernetes manifests for our services, this includes a deployment, services, etc, and this will become the backbone for our Helm chart later on.
To do this:
- Follow the installation instructions: here
- Once Kompose is installed,
cdto your monorepo - Optional:
mkdir kube*make a folder for the manifests to be written to - Run
kompose convertor if you made a kube directory:kompose convert -o ./kube - Your manifests should now be generated.
Helm:
Helm is a package manager for Kubernetes, it allows us to define, install and manage applications in Kubernetes, and helps simplify the process of deploying often complex applications to Kubernetes clusters. As mentioned earlier, we will now be using the generated Kubernetes manifests in our Helm chart.
Install Helm by following the installation guide.
We will start by creating a separate repository for the Helm chart.
To create the helm chart for our application:
cdto your Helm chart repo directory- Run
helm create ., this will create a directory structure like:
Chart.yaml
values.yaml
charts/
templates/
- The
Chart.yamlfile contains metadata about the chart (name, version, etc.). - The
values.yamlfile is where you define the default values for your templates. - The
templates/directory contains the Kubernetes manifest templates. - The
charts/directory is used for chart dependencies.
Copy the manifests which we generated using Kompose, into the templates/ directory.
Now you have a bare bones helm chart definition for your application, however there are some changes we are going to make so that we can make it easy for Renovate to update dependencies in our chart automatically.
You will have some manifests with the name ending -deployment.yaml, this is the manifest for the Kubernetes deployment for the service, essentially this is where the containers for this service will be defined, in here we will make the following change:
Find the code where the container is defined, it will look like:
  image: my-service
  name: my-service
and change it to:
image: "{{.Values.myService.image.registry}}/{{.Values.myService.image.repository}}:{{ .Values.myService.image.tag }}"
imagePullPolicy: "{{ .Values.myService.image.pullPolicy }}"
name: my-service
This will allow us to make changes to our Helm chart in the values.yaml file, specifying the image registry, image repository, image pull policy and image tag, an example of this would look like:
values.yaml:
workerService:
  image:
    tag: v1.3.2
    pullPolicy: IfNotPresent
    repository: randomrepo/xy-worker
    registry: 123456789012.dkr.ecr.us-west-1.amazonaws.com
Defining the values like this also helps Renovate identify the values which it will be using to automate the dependency updates.
Set your Chart version in chart.yaml:
apiVersion: v2
name: random-service
description: A Helm chart for random-service
version: 0.1.0 <- Modify this
appVersion: "1.16.0"
Now that we have defined the location of our images and the versions of the images we wish to use in this version of our helm chart, you are ready to package your helm chart, to package your helm chart, make sure you have your terminal at the root of your helm directory, and run:helm package [NAME]
This will create a file at the root called: [NAME]-[CHART_VERSION].tgz, this is your packaged helm chart.
We are now ready to push this to ECR, as mentioned above, we are assuming you have already created your ECR repository for your Helm chart. Lets get into the process of pushing the chart to ECR:
Push to your ECR repo:
helm push [NAME]-[CHART_VERSION].tgz oci://aws_account_id.dkr.ecr.us-west-2.amazonaws.com/
Authenticate with AWS ECR:
aws ecr get-login-password \
  --region us-west-2 | helm registry login \
  --username AWS \
  --password-stdin aws_account_id.dkr.ecr.us-west-2.amazonaws.com
You should now be able to see your helm chart in the repository UI in AWS ECR.
Renovate:
We have now pushed our Helm chart to our ECR repository, we now want to include the ability to update our chart dependencies (these are all the individual services in our application). To do this, we will be using Renovate which will automatically poll our ECR repositories for updated images of our services, and make pull requests in our GitHub repo to update this, meaning all you need to do is review and approve the PR and the chart will have up to date image references. Lets get started:
We will assume that you have your AWS_ACCESS_KEY_ID and AWS_SECRET_ACCESS_KEY.
- Install the Mend Renovate GitHub app to your Helm repo, this will allow RenovateBot to make PRs and will create a
renovate.jsonfile in the root. - You should see a PR from Renovate, approve and merge this.
- Log in to https://developer.mend.io and go to your repository
- Click settings
- Add a repository secret, called
ECR_PASSWORDand make the value set to your AWS_SECRET_ACCESS_KEY value. - Add a host rule, with the following values:
- Description: ECR
- Host Type: docker
- HostUrl: 123456789012.dkr.ecr.us-west-1.amazonaws.com (your ecr URL)
- Secret Type: Password
- Host Username: AWS_ACCESS_KEY_ID
- Secret: ECR_PASSWORD
- Update the
reonvate.jsonfile to include:
"$schema": "https://docs.renovatebot.com/renovate-schema.json",  "extends": ["config:recommended"],
"enabledManagers": ["helm-values"],
You should now have set up Renovate to poll ECR and create PRs to update your Helm chart, so that now whenever your automated image deployment to ECR is completed for a new version from your microservices monorepo, shortly after Renovate will create a PR to update those dependencies.
GitHub Actions:
Finally, now that we have our dependencies being updated automatically, we want to be able to create a new release when we have one ready and push it to our helm ECR repo.
To do so we will be following the pattern of the previous part, where we will use a new published release to trigger a GitHub action which will package our new version and push it to ECR.
Create 3 GitHub Actions Secrets in the repo, this can be done by:
- Navigating to the repo
- Going to Settings
- Navigating to the Secrets section and clicking Actions
- Create 3 secrets using the details obtained earlier:
- AWS_ACCESS_KEY_ID
- AWS_SECRET_ACCESS_KEY
- AWS_REGION
Create a new GitHub action in your Helm repo and name it create_chart_on_release.yml
The body of this new action will be:
name: Release Helm Chart

on:
  release:
    types: [published]

jobs:
  build-and-push:
    runs-on: ubuntu-latest

    steps:
      - name: Checkout code
        uses: actions/checkout@v3

      - name: Set up Helm
        uses: azure/setup-helm@v3
        with:
          version: v3.8.2 # Specify your required Helm version

      - name: Set up AWS CLI
        uses: aws-actions/configure-aws-credentials@v3
        with:
          aws-access-key-id: ${{ secrets.AWS_ACCESS_KEY_ID }}
          aws-secret-access-key: ${{ secrets.AWS_SECRET_ACCESS_KEY }}
          aws-region: ${{ secrets.AWS_REGION }}

      - name: Login to Amazon ECR
        id: login-ecr
        uses: aws-actions/amazon-ecr-login@v2

      - name: Package Helm Chart
        run: helm package . # Package the chart in the current directory

      - name: Package and push helm chart to Amazon ECR
        env:
          REGISTRY: ${{ steps.login-ecr.outputs.registry }}
          REPOSITORY: [Your chart repo name here]
        run: |
          CHART_PACKAGE=$(ls *.tgz)
          helm push $CHART_PACKAGE oci://$REGISTRY
Note: Update the repository env variable in the Package and push helm chart to Amazon ECR step.
With this action enabled, once you publish a release in GitHub, the action will automatically package the code from your repo into a helm chart, and push it to your Helm chart repo in ECR, simplifying the process of deploying your microservices to a Kubernetes cluster.
Wrapping it up:
Automating the updating of you dependency version in your helm chart will simplify and significantly speed up your delivery process, if you have followed the steps outlined in the post above you will:
- Have set up a very simple yet very powerful and configurable method for deploying any of your microservice based applications to any Kubernetes clusters.
- Have provided a robust and simple pipeline for packaging and pushing new versions of your applications Helm chart to AWS ECR.
The benefits for this are that you will have increased your overall delivery speed and efficiency, as well as taken the guesswork out of updating your dependencies.
Don't forget to subscribe for more tips and tutorials on streamlining your continuous delivery processes.
Thanks for reading!