Streamlining Microservices: Building and Deploying Docker Images to a private ECR with GitHub Actions

Introduction:
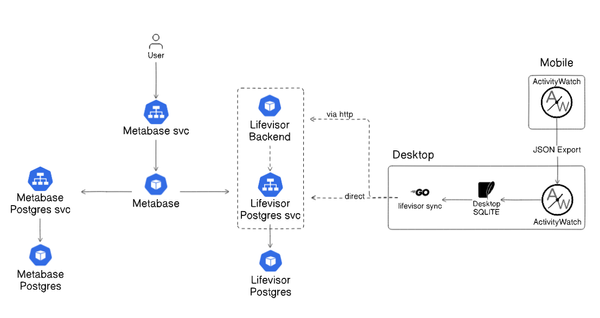
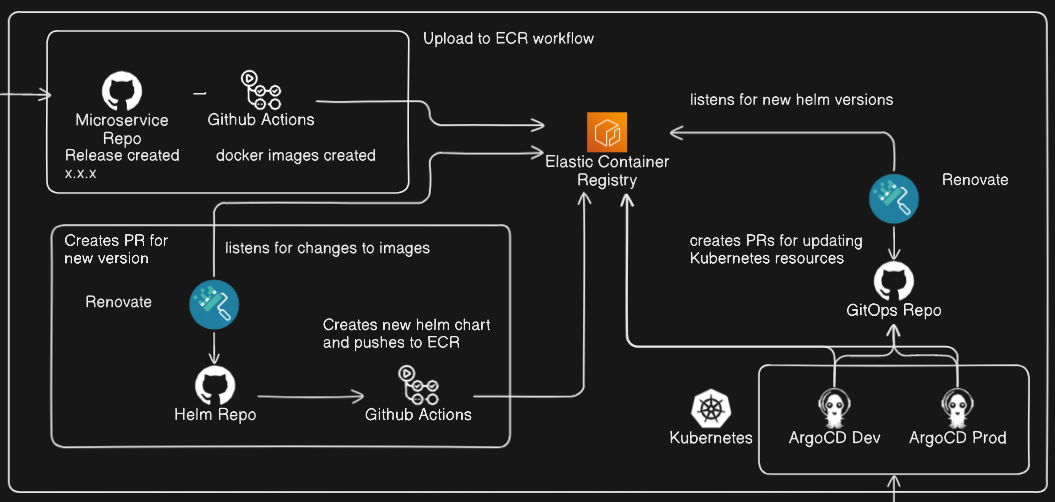
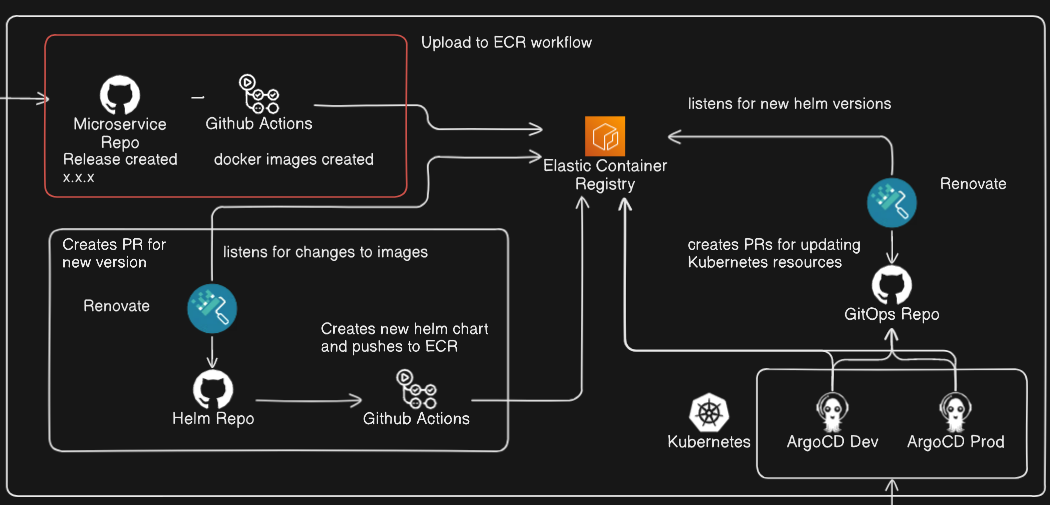
This will be the first in a series of posts outlining a continuous delivery pipeline that takes code from a GitHub repo and ultimately deploys running pods into a Kubernetes cluster via ArgoCD, the full workflow of which is demonstrated above.
For this blog post we will be focusing on the "Upload to ECR" section:
Use Case:
We want to be able to make changes to the code in our microservice monorepo, create a GitHub release, and have the images of each of our services created, tagged and pushed to our private ECR repo for use in deployments.
The tech involved:
For this we will be using:
- GitHub for hosting our code repo, and handling releases.
- GitHub Actions for the workflow.
- Docker for the container platform.
- AWS ECR to act as a Container registry.
Microservice Monorepo:
This is where we keep the code for our various microservices, where an example file structure for this repo would be:
.
├── docker-compose.yml
├── Makefile
├── README.md
├── auth-service
│   ├── Dockerfile
│   ├── go.mod
│   └── main.go
├── user-service
│   ├── Dockerfile
│   ├── go.mod
│   └── main.go
├── payment-service
│   ├── Dockerfile
│   ├── go.mod
│   └── main.go
└── email-service
    ├── Dockerfile
    ├── go.mod
    └── main.go
Each service in its own directory, with a Dockerfile, which is used to build the binaries and docker images within the docker-compose.yml file.
For example, during the development process an engineer may manually run make build or something similar that would in turn trigger docker compose to run and build an up to date image of each service. We will essentially be baking this process into an automated workflow with GitHub actions.
GitHub Actions
GitHub Actions allow us to automate and execute software development workflows, functioning as a workflow management service built into GitHub, there are many different use cases for GitHub Actions (including Automated Testing, Deployments, Triggering workflows in other services, etc.) but for this post we will be focusing on the ability to automate our software development workflow, and deploy container images to ECR.
Docker & AWS ECR
Docker is a container application platform, as outlined above each of our services has its own Dockerfile and throughout the development process, we use docker compose to build docker images from our code. ECR is a fully managed container registry provided by AWS, which we will be using to store the tagged images which are the output of our workflow.
The workflow
Below are the steps that our workflow will take:
- A developer merges a change that they have made in the repo
- The developer creates a Github release with a tag
- The images for our services are automatically built and tagged with the release tag.
- Our tagged images are pushed to our private ECR repo.
Putting it together:
In this example we will be assuming:
- That there is a
Makefilethat has a definition like in the repo:
build_mail:
	@echo "Building mail binary..."
	cd ./mail-service && env GOOS=linux CGO_ENABLED=0 go build -o ${MAIL_BINARY} ./cmd
	@echo "Done!"

action_build: build_mail build_gateway build_auth
	@echo "building to push to registry"
	docker compose up -d --no-deps --build
Which will build our binaries which will later be copied into the file systems of our container images during the image build process.
- That we have an existing private ECR repository with the correct corresponding names
GitHub Action: Building, Tagging and Uploading to ECR:
- For deploying to a private ECR you will need to create AWS IAM (Identity and Access Management) user with the "AmazonEC2ContainerRegistryFullAccess" permissions.
- Get the AWS Access Key ID and the Secret Access Key for this user you have created.
- Create 3 GitHub Actions Secrets in the repo, this can be done by:
- Navigating to the repo
- Going to Settings
- Navigating to the Secrets section and clicking Actions
- Create 3 secrets using the details obtained earlier:
- AWS_ACCESS_KEY_ID
- AWS_SECRET_ACCESS_KEY
- AWS_REGION
- Create a GitHub Actions workflow:
- Create a directory called ".github/workflows"
Inside this directory, create a YAML file called upload_to_ecr.yaml
name: Release to ECR

on:
  release:
    types: [published]

jobs:
  build-and-push:
    runs-on: ubuntu-latest

    steps:
      - name: Checkout code
        uses: actions/checkout@v3

      - name: Set up AWS CLI
        uses: aws-actions/configure-aws-credentials@v3
        with:
          aws-access-key-id: ${{ secrets.AWS_ACCESS_KEY_ID }}
          aws-secret-access-key: ${{ secrets.AWS_SECRET_ACCESS_KEY }}
          aws-region: ${{ secrets.AWS_REGION }}

      - name: Login to Amazon ECR
        id: login-ecr
        uses: aws-actions/amazon-ecr-login@v2

      - name: Build and push images
        run: |
          # Extract the AWS Account ID
          ACCOUNT_ID=$(aws sts get-caller-identity --query "Account" --output text)

          # Get the ECR repository URL
          ECR_URL=${ACCOUNT_ID}.dkr.ecr.${{ secrets.AWS_REGION }}.amazonaws.com

    	  PROJECT_NAME=$(basename "$PWD")

          RELEASE_TAG=${{ github.event.release.tag_name }}

          # Run the make command to build images
          make action_build

          # Define the services you want to exclude
          EXCLUDE_SERVICES=("event-queue")

          # Tag and push each service image
          for SERVICE in $(docker compose config --services); do
              # Check if the service is in the excluded list
              if [[ " ${EXCLUDE_SERVICES[@]} " =~ " ${SERVICE} " ]]; then
                  echo "Skipping ${SERVICE}"
                  continue
              fi

              TAG_NAME="${PROJECT_NAME}-${SERVICE}:latest"

              # Check if the image exists
              if [[ "$(docker images -q ${TAG_NAME} 2> /dev/null)" == "" ]]; then
                  echo "Image ${TAG_NAME} not found, skipping."
                  docker image ls -a
                  continue
              fi

              IMAGE_NAME="${ECR_URL}/${PROJECT_NAME}/${SERVICE}:${RELEASE_TAG}"

              docker tag ${TAG_NAME} ${IMAGE_NAME}
              docker push ${IMAGE_NAME}
          done
The above is the definition for our workflow, here's an explanation of the above:
- At the start, is the name of our action: Release to ECR, this is how our action will be named within GitHub actions.
- Next up, is the jobs section is where we define each of the jobs for our workflow, where we have a job called build-and-push this will run on the latest Ubuntu environment that is available in the GitHub Actions platform.
- Following that, we have the definition for each of the steps for this job:
- Starting with actions/checkout, this is a standard action which makes sure that the code stored in our repo is available within the workflow for the duration of the job.
- Next, we use the aws-actions/configure-aws-credentials@v3 action to set up the AWS CLI using the secrets that we created and configured earlier, this will set up our authorised connection to AWS.
- In the next step, we use the aws-actions/amazon-ecr-login@v2 action, which will use the connection to AWS from the previous step to secure a connection to AWS ECR.
- Finally, the Build and push images step will build our ECR URL from details that we provided as well as some details which it can retrieve from the AWS CLI and run our
make action_buildcommand, which builds our binaries, and then builds our images, it will then loop through each service defined in the docker compose (excluding some services that we can provide to exclude) and tag each image with the release tag and ECR repository location, finally pushing the images to the ECR
Next, is the schedule or trigger for our action to run, for this we have:
 on:
   release:
     types: [published]
Our action will trigger on the publishing of a release for this repo.
Wrapping it up:
Automating the deployment of images to your ECR repository can significantly speed up your development process, if you followed the steps outline in this post you can set up a robust and simple pipeline that makes sure you have the right images available when you need, just by publishing a release in your microservices repository.
The key benefits of this approach is to increase your overall development efficiency, and reduce any manual steps like manually building and tagging every image.
Don't forget to subscribe for more tips and tutorials on streamlining your development processes.
Thanks for reading!
Further reading:
For those interested to read more, here are some links to related topics for further reading: